Showing posts with label swing. Show all posts
Friday, January 23, 2015
Saturday, August 25, 2007
Aetas Now With Better Animation
Hey guys the previous few days i was to busy to do anything in java couldn't even get time to post.....But yeah i saw the awesome examples about which Romain posted on his blog the were seriously "Filthy Rich"!!!!!
I know the animation effect in Aetas was no good, so now there is an alternative version of Aetas (Available here).
I request you guys to tell me any sort of changes that i should introduce in Aetas or any bug that i might mot have noticed..........
Here are the link again:
http://code.google.com/p/ateas
Link to the binaries here:
http://aetas.googlecode.com/files/Aetas-bin.zip
The source here:
http://aetas.googlecode.com/files/Aetas_1.0-src.zip
I know the animation effect in Aetas was no good, so now there is an alternative version of Aetas (Available here).
I request you guys to tell me any sort of changes that i should introduce in Aetas or any bug that i might mot have noticed..........
Here are the link again:
http://code.google.com/p/ateas
Link to the binaries here:
http://aetas.googlecode.com/files/Aetas-bin.zip
The source here:
http://aetas.googlecode.com/files/Aetas_1.0-src.zip
Thursday, July 26, 2007
Aetas-Simple Tool & Cool Gui
I am a regularly read Romain's blog and have learned a lot of stuff from there. The one thing the impressed me the most was his post that read "simple tools for simple tasks ..... with cool gui" .
I developed Aetas(download link at the end) keeping in mind Romain's post "simple tools with simple tasks ..... with cool gui". So i gave it looks. The main frame screen shot :
Here I have used a custom made picture as the background. The various labels that you see were written with different font loaded at runtime.The highlight areas around the clock change their respective positions when clicked on, i.e when you click on the highlighted area which is a little lighter,when clicked on, swaps the position with the other.....
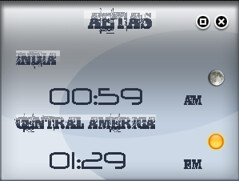
Now since the main frame is too big soI thought of adding a widget frame so that it can be run continuously. The screen shots are available in my previous post and here.
This widget frame consists of two different types of fonts.One being used as the label and the other for the clock.The switch from the main frame to the widget frame can be made by pressing the minimize button in the main frame.The transition from the main frame to the widget frame includes two animations.the first animation wraps the main frame while the second moves the widget frame to the right corner of your screen.
It also includes a splash screen(Screen shots available in the previous post).
It includes usage of GradientPaint to make the labels look better.
For downloading Aetas' binaries and sources please follow:
http://code.google.com/p/aetas
I developed Aetas(download link at the end) keeping in mind Romain's post "simple tools with simple tasks ..... with cool gui". So i gave it looks. The main frame screen shot :

Here I have used a custom made picture as the background. The various labels that you see were written with different font loaded at runtime.The highlight areas around the clock change their respective positions when clicked on, i.e when you click on the highlighted area which is a little lighter,when clicked on, swaps the position with the other.....
Now since the main frame is too big soI thought of adding a widget frame so that it can be run continuously. The screen shots are available in my previous post and here.
This widget frame consists of two different types of fonts.One being used as the label and the other for the clock.The switch from the main frame to the widget frame can be made by pressing the minimize button in the main frame.The transition from the main frame to the widget frame includes two animations.the first animation wraps the main frame while the second moves the widget frame to the right corner of your screen.
It also includes a splash screen(Screen shots available in the previous post).
It includes usage of GradientPaint to make the labels look better.
For downloading Aetas' binaries and sources please follow:
http://code.google.com/p/aetas
Tuesday, July 10, 2007
Ready for Aetas?
Hey guys in my last post i talked about "AETAS"......its now ready and can be downloaded from Google Code site.It includes a widget frame too(who would like to see big frame on their screens all the time?). Everyone might be interested in the screen-shots,without further ado, here they are:
1) The splash screen(shouldn't have written author but anyways)
2)Main Window(press the minimize button to switch to the mini view):
3)Widget window(or the mini frame):
(press the maximize button in the mini frame to switch to the main view)
For a some fun,I added a little animation when the frame switches from Main view to the mini view.Check it out yourself.
Here is the link again:
http://code.google.com/p/aetas
1) The splash screen(shouldn't have written author but anyways)
2)Main Window(press the minimize button to switch to the mini view):
3)Widget window(or the mini frame):
(press the maximize button in the mini frame to switch to the main view)For a some fun,I added a little animation when the frame switches from Main view to the mini view.Check it out yourself.
Here is the link again:
http://code.google.com/p/aetas
Sunday, April 15, 2007
Make The Swing Fly
Recently this thing struck my head that i can make my JFrame(Swing components)"Fly In" when the application is started and fly out when the quit button is hit and ended up with the following code.Use it and add a better entrance and exit effect to your applications!!!!!
I'll be adding it to NYouTube.
Enjoy!
:-)
I'll be adding it to NYouTube.
Enjoy!
:-)
import javax.swing.*;
import java.awt.*;
import java.awt.event.*;
public class Test extends JFrame {
JFrame f;
JButton jb;
Dimension t;
public Test(){
f=new JFrame("Flying window");
jb=new JButton("Quit");
//Get the screen size
t=Toolkit.getDefaultToolkit().getScreenSize();
jb.addActionListener(new ActionListener() {
public void actionPerformed(ActionEvent evt) {
//The Fly Out effect
for(int i=t.width/2;i>=0;i-=2)
{
f.setLocation(i,i);
f.repaint();
}
System.exit(0);
}
});
f.getContentPane().add(jb);
f.pack();
f.setSize(100,100);
f.setDefaultCloseOperation(3);
f.setVisible(true);
//The Fly In effect
for(int i=0;i<=t.width/2;i+=2)
{
f.setLocation(i,i);
f.repaint();
}
}
public static void main(String[] s)
{
new Test();
}
}
Friday, March 30, 2007
Transparent Window In Java Back With A BANG
Here is another version of code for Transparent Window in Java seems to be better than any of the previous version and has a blur effect to emulate the Vista look.Here is the code:
import javax.swing.*;
import java.awt.*;
import java.awt.event.*;
import java.awt.image.*;
public class TransparentBackground extends JComponent
implements ComponentListener, WindowFocusListener, Runnable {
private JFrame _frame;
private BufferedImage _background;
private long _lastUpdate = 0;
private boolean _refreshRequested = true;
private Robot _robot;
private Rectangle _screenRect;
private ConvolveOp _blurOp;
public TransparentBackground(JFrame frame) {
_frame = frame;
try {
_robot = new Robot();
} catch (AWTException e) {
e.printStackTrace();
return;
}
Dimension dim = Toolkit.getDefaultToolkit().getScreenSize();
_screenRect = new Rectangle(dim.width, dim.height);
float[] my_kernel = {
0.10f, 0.10f, 0.10f,
0.10f, 0.20f, 0.10f,
0.10f, 0.10f, 0.10f};
_blurOp = new ConvolveOp(new Kernel(3, 3, my_kernel));
updateBackground();
_frame.addComponentListener(this);
_frame.addWindowFocusListener(this);
new Thread(this).start();
}
protected void updateBackground() {
_background = _robot.createScreenCapture(_screenRect);
}
protected void refresh() {
if (_frame.isVisible() && this.isVisible()) {
repaint();
_refreshRequested = true;
_lastUpdate = System.currentTimeMillis();
}
}
protected void paintComponent(Graphics g) {
Graphics2D g2 = (Graphics2D) g;
Point pos = this.getLocationOnScreen();
BufferedImage buf = new BufferedImage(getWidth(), getHeight(), BufferedImage.TYPE_INT_RGB);
buf.getGraphics().drawImage(_background, -pos.x, -pos.y, null);
Image img = _blurOp.filter(buf, null);
g2.drawImage(img, 0, 0, null);
g2.setColor(new Color(255, 255, 255, 192));
g2.fillRect(0, 0, getWidth(), getHeight());
}
public void componentHidden(ComponentEvent e) {
refresh();
}
public void componentMoved(ComponentEvent e) {
repaint();
}
public void componentResized(ComponentEvent e) {
repaint();
}
public void componentShown(ComponentEvent e) {
repaint();
}
public void windowGainedFocus(WindowEvent e) {
refresh();
}
public void windowLostFocus(WindowEvent e) {
refresh();
}
public void run() {
try {
while (true) {
Thread.sleep(100);
long now = System.currentTimeMillis();
if (_refreshRequested && ((now - _lastUpdate) > 1000)) {
if (_frame.isVisible()) {
Point location = _frame.getLocation();
_frame.setLocation(-_frame.getWidth(), -_frame.getHeight());
updateBackground();
_frame.setLocation(location);
refresh();
}
_lastUpdate = now;
_refreshRequested = false;
}
}
} catch (InterruptedException e) {
e.printStackTrace();
}
}
public static void main(String[] args) {
JFrame frame = new JFrame("Transparent Window");
TransparentBackground bg = new TransparentBackground(frame);
frame.setDefaultCloseOperation(JFrame.EXIT_ON_CLOSE);
frame.getContentPane().add(bg);
frame.pack();
frame.setSize(200, 200);
frame.setLocation(500, 500);
frame.setVisible(true);
}
}
For Mac Users you need to simply write the following
import java.swing.*;
.......
public class TransparentBackground{
.......//code here
.......//code here
.......//code here
.......//code here
import javax.swing.*;
import java.awt.*;
import java.awt.event.*;
import java.awt.image.*;
public class TransparentBackground extends JComponent
implements ComponentListener, WindowFocusListener, Runnable {
private JFrame _frame;
private BufferedImage _background;
private long _lastUpdate = 0;
private boolean _refreshRequested = true;
private Robot _robot;
private Rectangle _screenRect;
private ConvolveOp _blurOp;
public TransparentBackground(JFrame frame) {
_frame = frame;
try {
_robot = new Robot();
} catch (AWTException e) {
e.printStackTrace();
return;
}
Dimension dim = Toolkit.getDefaultToolkit().getScreenSize();
_screenRect = new Rectangle(dim.width, dim.height);
float[] my_kernel = {
0.10f, 0.10f, 0.10f,
0.10f, 0.20f, 0.10f,
0.10f, 0.10f, 0.10f};
_blurOp = new ConvolveOp(new Kernel(3, 3, my_kernel));
updateBackground();
_frame.addComponentListener(this);
_frame.addWindowFocusListener(this);
new Thread(this).start();
}
protected void updateBackground() {
_background = _robot.createScreenCapture(_screenRect);
}
protected void refresh() {
if (_frame.isVisible() && this.isVisible()) {
repaint();
_refreshRequested = true;
_lastUpdate = System.currentTimeMillis();
}
}
protected void paintComponent(Graphics g) {
Graphics2D g2 = (Graphics2D) g;
Point pos = this.getLocationOnScreen();
BufferedImage buf = new BufferedImage(getWidth(), getHeight(), BufferedImage.TYPE_INT_RGB);
buf.getGraphics().drawImage(_background, -pos.x, -pos.y, null);
Image img = _blurOp.filter(buf, null);
g2.drawImage(img, 0, 0, null);
g2.setColor(new Color(255, 255, 255, 192));
g2.fillRect(0, 0, getWidth(), getHeight());
}
public void componentHidden(ComponentEvent e) {
refresh();
}
public void componentMoved(ComponentEvent e) {
repaint();
}
public void componentResized(ComponentEvent e) {
repaint();
}
public void componentShown(ComponentEvent e) {
repaint();
}
public void windowGainedFocus(WindowEvent e) {
refresh();
}
public void windowLostFocus(WindowEvent e) {
refresh();
}
public void run() {
try {
while (true) {
Thread.sleep(100);
long now = System.currentTimeMillis();
if (_refreshRequested && ((now - _lastUpdate) > 1000)) {
if (_frame.isVisible()) {
Point location = _frame.getLocation();
_frame.setLocation(-_frame.getWidth(), -_frame.getHeight());
updateBackground();
_frame.setLocation(location);
refresh();
}
_lastUpdate = now;
_refreshRequested = false;
}
}
} catch (InterruptedException e) {
e.printStackTrace();
}
}
public static void main(String[] args) {
JFrame frame = new JFrame("Transparent Window");
TransparentBackground bg = new TransparentBackground(frame);
frame.setDefaultCloseOperation(JFrame.EXIT_ON_CLOSE);
frame.getContentPane().add(bg);
frame.pack();
frame.setSize(200, 200);
frame.setLocation(500, 500);
frame.setVisible(true);
}
}
For Mac Users you need to simply write the following
import java.swing.*;
.......
public class TransparentBackground{
.......//code here
.......//code here
.......//code here
.......//code here
frame.setBackground(new Color(0, 0, 0, 0));
}
Subscribe to:
Posts (Atom)